Writing a Resource Definition
In this example we’re going to write a custom resource for Lambda Layers.
Note
Before getting started you should definitely check out anatomy_of_a_custom_resource to get an overview of the data structure we are going to build.
Get the metadata
First we’re going to use the AWS CLI to get an example response JSON for the API call we need to make to list Lambda Layers
$ aws lambda list-layers
{
    "Layers": [
        {
            "LayerName": "test-layer",
            "LayerArn": "arn:aws:lambda:eu-west-1:123456789012:layer:test-layer",
            "LatestMatchingVersion": {
                "LayerVersionArn": "arn:aws:lambda:eu-west-1:123456789012:layer:test-layer:1",
                "Version": 1,
                "Description": "This is a test layer!",
                "CreatedDate": "2020-10-17T13:18:00.303+0000",
                "CompatibleRuntimes": [
                    "nodejs10.x"
                ]
            }
        }
    ]
}
Create the tests
We can now use this to build the test specification in tests/integration/custom_resources/lambda/layer_multiple_resources.json.
We need to populate the following keys in this json:
servicemockDatagetResourcesexpectedCallsexpectedResults
Populate the mock
{
    "mockData": {
        "get_paginator.side_effect": [
            {
                "paginate.return_value": [
                    {
                        "Layers": [
                            {
                                "LayerName": "test-layer",
                                "LayerArn": "arn:aws:lambda:eu-west-1:123456789012:layer:test-layer",
                                "LatestMatchingVersion": {
                                    "LayerVersionArn": "arn:aws:lambda:eu-west-1:123456789012:layer:test-layer:1",
                                    "Version": 1,
                                    "Description": "This is a test layer!",
                                    "CreatedDate": "2020-10-17T13:18:00.303+0000",
                                    "CompatibleRuntimes": [
                                        "nodejs10.x"
                                    ]
                                }
                            }
                        ]
                    }
                ]
            }
        ]
    }
}
We’re populating the return_value of get_paginator.side_effect.paginate as this is the name of the Boto3 client method that
will be used internally to fetch the resource. This is because CloudWanderer always uses Collection s which paginate whenever possible.
Populate the scenarios
Now we need to populate our getResources and expectedResults keys.
Get Resources
This section simply specifies the arguments passed to the get_resources method when the test calls it.
{
    "getResources": {
        "serviceName": "lambda",
        "resourceType": "function",
        "region": "eu-west-2"
    },
}
Expected Results
The expected results you can leave blank until you run the test and see what the output is, as it’s pretty tough to predict what it’s going to be. What matters is taking the output from the test when the assertion fails and validating that it is actually what you expected. For now, let’s just put an empty dict.
{
    "expectedResults": [{}]
}
Populate the definition
Now we’ve written our tests we can set about creating our definition file in aws_interface/resource_definitions/lambda/2015-03-31/resources-1.json.
The 2015-03-31 date comes from the latest version subfolder in the service definition in botocore which you can find here for lambda .
Note
Check out anatomy_of_a_custom_resource to get an overview of the data structure we are going to build.
To populate our resource definition we need:
Collection Request Operation Name
Collection Identifier
Collection Resource Path
Resource Shape
Getting the request operation name
We need to lookup the API request operation name in the BotoCore service definition so that we can
confirm we have the right API method name and as the starting point for discovering the resource shape.
Visit Botocore’s specification data on GitHub and open the latest service-2.json for your service.
In our case this is lambda/2015-03-31/service-2.json
Look for the PascalCase name of the Boto3 method we would use to query this resource. In our case list_layers becomes ListLayers.
This is our Request Operation Name.

Getting the resource shape
We now need to find out what the BotoCore resource shape is for the resource returned from our API call (ListLayers).
You can see above that our ListLayers outputs a ListLayersResponse resource type. Search for that to find what shape that contains.
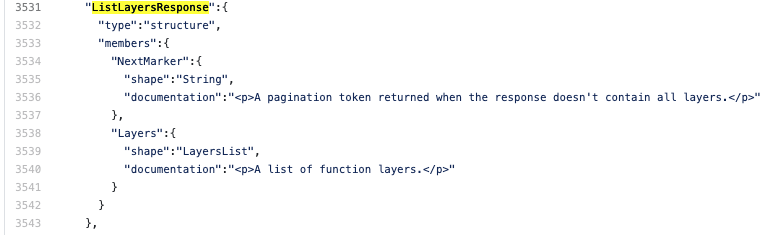
We can see this has the shape LayersList, let’s search for that.
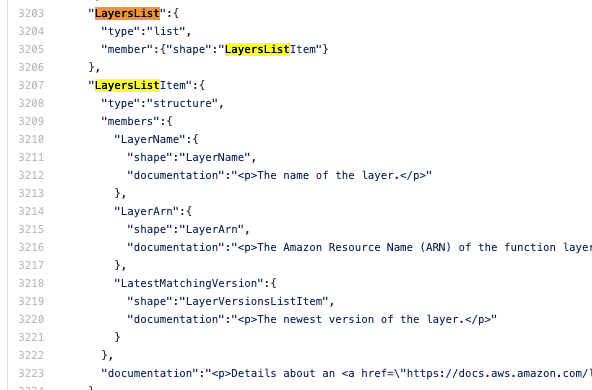
This is helpful! Our next stop is right below the last, we can see that this contains a LayersListItem which is our Resource Shape.
Determining the collection resource identifier
The identifier of this resource will be the element of the resource shape which is unique in this region in this account.
Don’t be fooled into using the ARN if another shorter unique identifier is available. While LayerARN may seem our obvious candidate, we actually want
LayerName. This is because:
LayerNameis unique across all layers in this account and regionLayerNameis the argument tolist-layer-versionswhich we will probably need in the future.LayerNameis an easierresource_idfor ourURNcreation.
Our identifier has three elements:
Target (the name we will use to refer to the identifier later)
Source (where the identifier can be found, in this case
responsebecause it comes from theListLayersresponse)Path (the JMESPath to the identifier within the
ListLayersresponse)
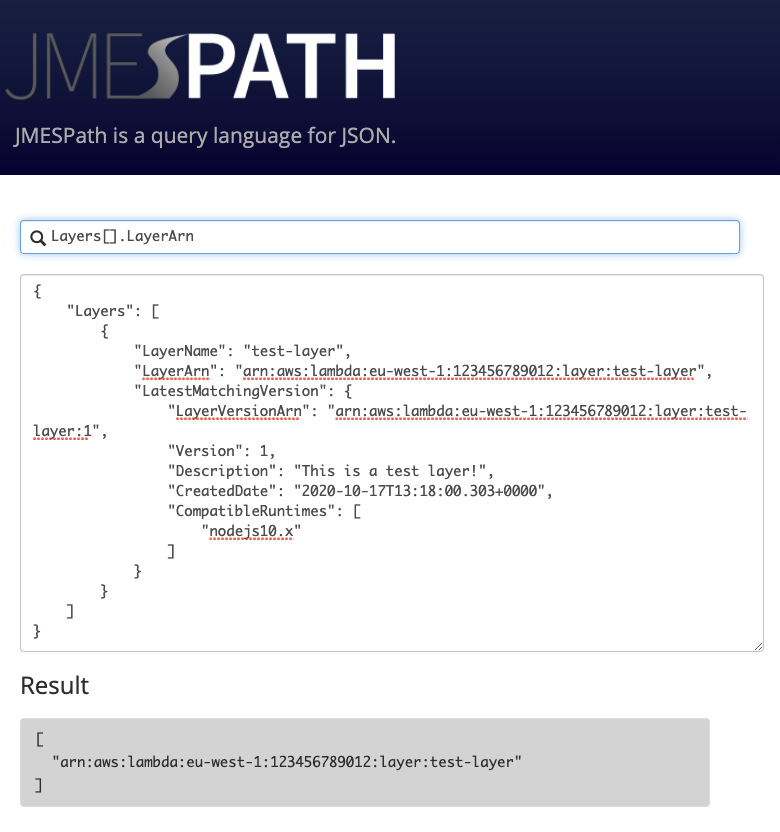
The trickiest of these is the Path. The easiest way to figure out what it is is to take the JSON payload you retrieved earlier from aws lambda list-layers
and paste it into jmespath.org and build your JMESPath there.
Putting those three pieces together we end up with something that looks like this:
{
    "target": "LayerName",
    "source": "response",
    "path": "Layers[].LayerName"
}
Determining the collection resource path
The is simply the JMESPath that retuns a single resource from the response. You can re-use the JSON output you pasted into https://jmespath.org above and try:
Layers[]
Populating the collection
Now we have the various components we can write our collection specification:
 1{
 2    "service": {
 3        "hasMany": {
 4            "Layers": {
 5                "request": {
 6                    "operation": "ListLayers"
 7                },
 8                "resource": {
 9                    "type": "Layer",
10                    "identifiers": [
11                        {
12                            "target": "LayerName",
13                            "source": "response",
14                            "path": "Layers[].LayerName"
15                        }
16                    ],
17                    "path": "Layers[]"
18                }
19            }
20        }
21    },
22    "resources": { }
23}
The most crucial things here are:
The collection request operation name is correct on line 6
The resource type on line 9 matches the name of the key we will create under
resourcesin the next step.The identifier path on line 14 is correct
The collection resource path on line 17 is correct
Populate the resource
 1{
 2    "service": {  },
 3    "resources": {
 4        "Layer": {
 5            "identifiers": [
 6                {
 7                    "name": "LayerName",
 8                    "memberName": "LayerName"
 9                }
10            ],
11            "shape": "LayersListItem"
12        }
13    }
14}
There’s very little to our resource.
We’re specifying that we’re inheriting the LayerName as an identifier from the collection members.
The most crucial things here are:
That the resource name on line 4 matches the resource type specified in the collection. This does not have to match any Boto3 or BotoCore names and will be the name you supply when calling
write_resourceswith theservice_namesargument.That the shape on line 11 is the shape we found in the Botocore
service-2.jsondefinition.
Note
Normally we would have a load key inside our resource, however in this case Lambda Layers have no Describe API method
therefore we cannot load them by name. The impact of this is that we cannot use write_resource() with this resource type.
Writing the Service Map
The service map is CloudWanderer’s store for resource type metadata that does not fit into the Boto3 specification.
It broadly follows the structure of Boto3’s to try and keep things simple and consistent.
For our new Layer resource we just need to ensure that the following exists in aws_interface/resource_definitions/lambda/2015-03-31/resources-cw-1.json
 1{
 2    "service": {
 3        "globalService": false,
 4        "regionalResources": true
 5    },
 6    "resources": {
 7        "Layer": {
 8            "type": "baseResource"
 9        }
10    }
11}
globalServiceindicates whether the service has a Global API or not (that is, whether all API requests go to a single region, e.g.us-east-1for IAM).regionalResourcesindicates whether the service has regional resources or not (most do, but some, like IAM do not).typeindicates what type of resource this is, eitherbaseResource,subresourceorsecondaryAttribute.
Running the tests
Now you’ve put all the pieces together you need to run the tests. You can see the specifications on GitHub:
To run the tests:
# Install the pre-reqs
$ pip install -r requirements-test.txt -r requirements.txt
# Install the package in interactive mode
$ pip install -e .
# Run the tests
$ pytest tests/integration/custom_resources/ -k layer_multiple_resources
AssertionError: Dictionaries do not match
E           Second dict as json: {"urn": ...
You can then take the Second dict as json result and place it in your expectedResults list, validate it’s what you expect, and re-run the test.
Tip
Make sure to remove the key/value for discovery_time as this will change with every test execution!
Submit a PR!
Congratulations! You have successfully created a new resource! If you submit a Pull Request to https://github.com/CloudWanderer-io/CloudWanderer/ with your new resource we will get it merged in and released for everyone to use as quickly as we possibly can! If you find you’re not getting the attention you deserve for whatever reason, contact us on twitter.